The Legend of
the Black Sunshine -
by Jon Jarosz ( a.k.a. Jonny Cannon)
|
After a year of showing the bike, I
decided that it needed something else. The entire front
end was still stock, and that simply would not do. It
needed something more. As well, I tossed around the
idea of putting a turbocharger on it, but that was too
easy; anybody could simply bolt on the kit and go. No;
I needed something exotic. I am a big fan of engines.
I like the way they look in a bike. I want a big, huge
monster motor sticking out of the frame.
And then I discovered Joe Haile’s book
“Motorcycle Turbocharging, Supercharging, and Nitrous
Oxide”. My bible. If you ever can only purchase one
book before you die, this is the book to get. It
explains, in layman’s terms, how you can
“do-it-yourself” modify the living crap out of your
motorcycle.
But I’m not going to get into that yet.
You can chomp at the bit for just a little while longer
before I get to Project Supercharger.
The front end had to go.
Click on the photos to enlarge them. |
|
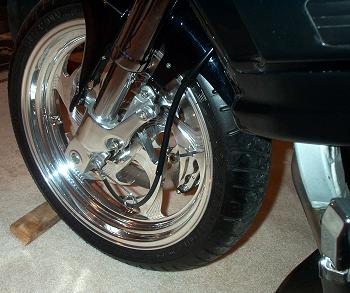 |
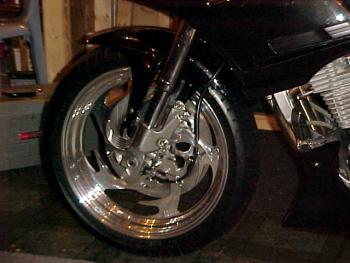
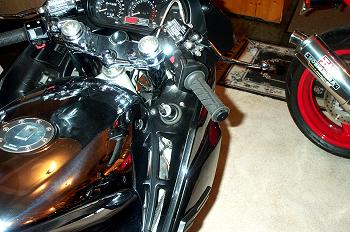
I came across a GSXR-1100 front end,
complete, and it included Ohlins progressive
suspension. I had it disassembled for me, as you
require a specialty wrench, which is $400 Canadian. I
took the parts to get them chromed and polished. I deal
with Platingmaster, in London. Gerry Harris is the
owner, and has done every single piece of chrome on the
bike.
As far as fitment goes,
it wasn’t too difficult. Of course, you can’t use the
FJ upper and lower triple clamps, but you do require the
FJ steering stem. The GSXR stem is too short. Of
course, you use FJ bearings, since the neck doesn’t
change. Once you get the bike level, and decide how you
want to position the front forks (my front end is
slightly lowered), you can access the bolts on the lower
triple clamp by removing the air scoops – the bolts are
right there. I relocated the horn using a mount that
was there. With a bit of “gentle persuasion”, the FJ
speedo cable will fit into the GSXR speedo unit, located
at the base of the left fork. |
|
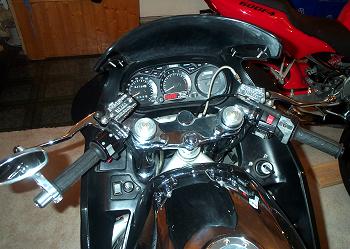
There was a slight
problem with the clip-ons. In their normal position,
they were a bit low, and hit the upper fairing, thus
preventing the handlebars from turning either
direction. I solved this problem by flipping them
upside down, and interchanging left for right. Once
chromed, you can’t really tell that they are upside-down
on the bars.
-------------------------->
|
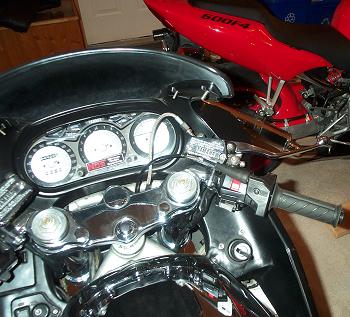
The
existing FJ clutch and brake cylinders are of a slightly
smaller diameter than the Gixxer clip-ons, so I had to
go and get them milled down a bit smaller. That fixed,
the FJ reservoirs fit just fine. Since the new
carburetor utilizes a push-pull setup, I purchased a ¼
quick-turn throttle. It took a bit of fancy routing to
get the cable to work in a manner that I was comfortable
with, but it all worked out. The advantage to the
throttle I used is that it has a pulley on top which
allows you to mount the throttle in any position in
order to make it work.
 |
|
The
stock FJ ignition does not fit into the Gixxer triple
clamp.
The
front end I purchased didn’t have an ignition, so I
capped the hole, and relocated the ignition switch to
the right dash panel.
|
 |
|
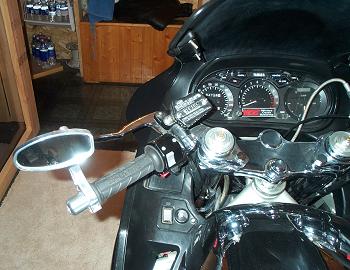 |
I also managed to pick
up a real trick Italian-made polished aluminum mirror
which bolted to my handlebar weight for the left side.
It was a bit dear, at
$273.00 Canadian, plus tax.
Nothing too good for baby, though, right? |
|
I decided to go with
only one front brake disc for two reasons: First of
all, I wanted to maintain the drag-bike theme, and I
wanted to show off the PM front wheel. I put the brake
disc on the right side (whereas normally it is
recommended that the front disc should be mounted on the
left, so as to offset the rear disc), because the left
side of the bike is it’s “primary show side” – that is,
the left side of the bike displays the most
modifications, so the decision was based mainly on
esthetics.
The PM rim is a 17” x 3.5”, and is the
“Tribal” model. It was not on the model list for sport
bikes. I chose the pattern out of their Harley-Davidson
catalogue, but Performance Machine will spin you the
wheel of your choice, for the bike of your choice if you
ask. The wheel was $1300 Canadian, which really wasn’t
much more than their prices of a couple of years ago. I
chose the wheel because the style appealed to me. Last
year, I noticed that almost every other show bike on the
circuit shared the same style of wheel; it must have
been very popular.
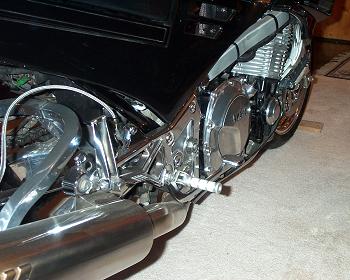
Where Performance
Machine doesn’t charge an exorbitant amount for their
rims, they more than make up for it with their
calipers. I ordered a single-piston caliper for the
rear, and a triple-piston caliper for the front, both
chromed rather than polished. The rear caliper was $500
and the front was $800. When they arrived, I handled
them like newborn infants. I designed my own mounting
brackets, which is actually a bit trickier than you
would think. Making a bracket to mount a caliper is
simple enough, but it has to be designed so that the
largest surface area of brake pad connects with the
disc, the bracket is strong enough to withstand the
shear-forces on it related to braking, and, most
important of all, the disc has to end up being centered
between the pads so that there is no brake drag.
Fortunately, one of my friends runs a laser CNC machine,
so that alleviated the cost associated with
trial-and-error. |

 |
|
 |
I kept the braided Russell brake lines
that I had used on the stock FJ front end. On any
motorcycle, I would highly recommend braiding the brake
lines; it is not too expensive, and enhances the braking
of the motorcycle tremendously.
I liked the “two-lines-into-one-caliper”
look, since I hadn’t seen it done on anything else in
this fashion. I needed to have a custom braided rear
line made, because of the orientation of the rear PM
caliper and the extended swingarm. Also, it completed
the look. The brake disc is the stock Suzuki unit that
has been polished.
All of the easy work was done. Now for
the hard part. |
|
It is generally
accepted in performance circles that you can safely add
less than 10 pounds of boost to a bike without having to
incorporate detonation control (ie low compression
pistons, etc). since I was running the juice, and also
had the Wiseco’s in there (10.25 to 1), I didn’t need
something uncontrollable.
Joe Haile’s book had become my bible. It
explained everything, and even provided a list of
suppliers, and complete contact information.
Sims & Rohm created a 1400cc GSXR with
nitrous and a supercharger back in the late 1990’s for
Cycle World’s “UFO Shootout” (you may recall seeing a
turbo/nitrous FJ in that competition, one of those
years). That bike provided me with a great deal of
inspiration. Sims & Rohm actually make a supercharger
kit for GSXR’s, and it is easy to mount because of the
high frame configuration on the Suzooks.
The lateral frame on the FJ looked like
it may present a problem.
The first thing I did was decide on a
blower. Fageol Superchargers make a self-lubricating
unit, which was exactly what I wanted. No extra oil
lines to run, no new fittings to try and track down.
This is also the model of blower Sims & Rohm use in
their kits.
I called Mark Fageol, and we set about
having a chat. He faxed me the physical dimensions of
the blower, so I could set about determining if the unit
could fit. It should be noted that Mark was as
fantastic to deal with as JMC Swingarms were. He
returned all of my phone calls, and was constantly there
to give me technical advice throughout the entire
“Project Supercharger”.
I opted to go with a draw-through
system. That is a system where the supercharger bolts
directly to the motor with the carburetor behind it. It
“draws” fuel and air through it. Advantages: the
set-up takes up less space, and requires no
pressure-relief pop-off valve. Disadvantage: low-speed
idle is terrible.
With measurements in hand, I took the gas
tank on and did some brief work. I had to take into
account the blower being centered, in-line with the
intakes. It would be too hard to make an intake
manifold that angled upward. It appeared as though
everything would fit. There was enough space between
the top of my cam-chain tensioner and the bottom of the
gas tank. However, I had forgotten to take into account
that the sides of the FJ’s gas tank flare downward.
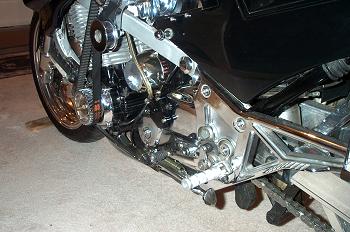
Down at the crank, I decided to try to
use the side where the ignition advancer exists. To be
perfectly honest with you, I wanted to try it “the easy
way” before I split the cases. |
|
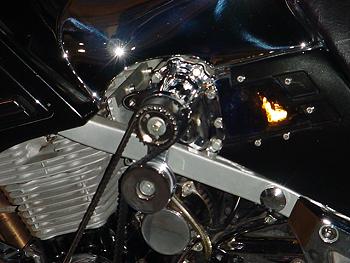
I removed the bolt
that attaches the ignition advancer to the crankshaft,
and found that is threaded in 2 full inches. I barely
needed two inches on the outside to fit the advancer &
pulley, so I decided to give it a go. I wanted to see
if it would work without an offset bearing. I had a
threaded rod with a keyway on it machined up. I
installed the advancer and a nut to hold it, and then
slid the pulley on, bolting it on as well. |
 |
|
After that, using
Mark’s measurements, I roughly estimated the length of
the supercharger drive I would need, and found I
required a 4” extension. I told Mark I wanted 9psi of
boost at 9,800 RPM’s, and he gave me the correct pulley
combination.
------------>
|
The blower ended up
costing me around $1500 Canadian, and included pulleys
and belts. Of course, the belts came after the blower
was mounted so that the correct length could be
obtained.
When the blower came, I lined it up and
realized my first mistake. Yes, the blower did fit
under the gas tank. However, the drive unit hit the
flared sides of the gas tank. The only solution was to
cut the gas tank. Fortunately, I had a spare tank, so I
used my existing chrome tank as a template. My spare
tank was physically in better shape. Still, it was
pretty hard taking a hacksaw to my beautiful chrome gas
tank. I brought my template back to Gerry Harris at
Platingmaster, because he knew the guy who does gas tank
work for Rocky’s Harley-Davidson in London, Ontario. My
spare, and the template were shipped to the guy. In two
weeks, I had the new tank back, welded and
pressure-tested. I brought it home to make sure it fit,
and then brought it back to Gerry to be chromed. Out of
professional courtesy, I am not permitted to quote the
amount I paid for either of these services; suffice to
say, it was a great deal of work, and in my opinion,
Gerry is the best in the business. |
|
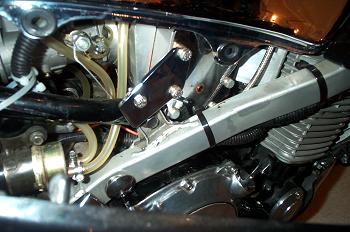
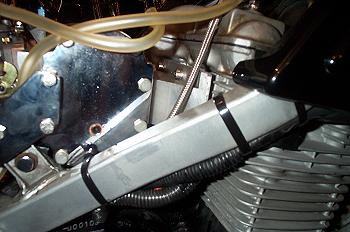
Mistake number two was
worse. Because I had to extend the drive unit, a part
of the blower hit the frame. There was not much of a
way to fix this. I tried several possibilities, and
short of simply jumping up and down on the supercharger
to make it fit, the only option was to cut a small
section out of two sides of the boxed frame. I was not
too keen on this, but discovered a way to rectify any
stress issues. If you remove the airbox on the FJ,
there are two large brackets where the airbox bolts in.
These are welded directly to the frame. I decided that
I would integrate the blower as an actual cross-member
of the frame. These triangular-shaped brackets were
made once the intake manifold was constructed, and the
supercharger set into its’ permanent location.
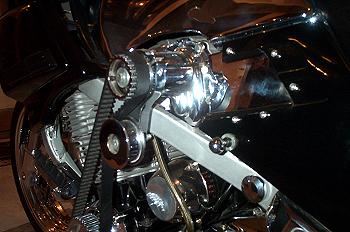
The drive unit
also interfered with the side cover on the FJ. I
measured several times before I cut my custom-painted
bodywork. I removed the bodywork that was in the way.
I ended up installing the small chromed cover plate you
can see in the pictures, because otherwise, the existing
mesh in the side panel sticks out and looks both lousy
and unfinished. |
 Supercharger Mounting Bracket
 |
|
The intake itself was
going to present a bit of a challenge to design (the
intake between the blower & the head, henceforth
referred to as the “blower manifold”). Over a distance
of two inches, the blower intake had to angle outwards
to match the spacing of the intake ports on the head.
Now that the blower was situated, I was able to start
making a template. I made a couple of cardboard
cutouts, and when bolt patterns, etc, were determined, I
had two 1/16” thick rectangular aluminum plates made,
with a pair of intake holes in each one. The location
of the cam chain prevented the construction of a simple
rectangle. From a top view, the manifold had to
resemble a “V” shape in its’ construction. There are
two outputs on the blower, which also made things
easier; one output for two intakes.
Once the aluminum plates were made, and
the supercharger was centered, both vertically and
horizontally (so I knew it would fit), I went to Rudy’s
Machine Shop in Ayr, Ontario. Although they normally
accommodate mass-produced contracts, they will also do
one-offs. Fortunately, the gentleman who did all of the
blower intake machining, John Needham, is also a biker,
so he already was familiar with what I was working with.
----------------------> |
 I’d like to take a brief moment here to plug Rudy’s
Machine Shop – they were amazing, from the owner, to
their office staff, to the guys doing the work. All of
them were friendly as hell, and I received quick and
efficient service. They made me feel like my project
was important, and not just a little job that they’d
“fit in when they could”.
Anyways, I basically
gave John the cardboard cutouts I had, the supercharger,
and the manifold plates, and said “these have to fit
this, and you have 2” of distance to do it in”. |
|
 |
Once the blower manifold was complete, I
set about bolting it in. I ran into a bit of an issue
with the size of the heads of the metric allen-bolts (I
have converted pretty much all of the bolts on this bike
to stainless steel metric allen-head bolts, for both
strength, and esthetics). I was using, but managed to
get everything to work.
I used standard high-heat engine
gaskets. It was pretty cool, I must say, to see the
supercharger on there. The blower pulley was also
perfectly aligned with the drive pulley. I put the belt
on, and tightened it by adjusting the tensioner pulley.
Now it was time to get some fuel for this
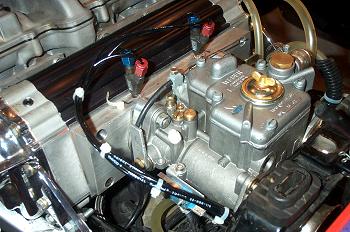
girl. I used a Weber DCOE 45mm dualthroat sidedraft
carb, as recommended by Fageol, and also used by Sims &
Rohm in their kits (unless you choose fuel injection).
It wasn’t too much work to get it to fit. The carb has
to sit as level and as flat as possible.
The blower is angled upwards slightly,
and to simply bolt on the carb caused it to hit the
bottom of the gas tank (of course, nothing else fit
perfectly, why should the last component NOT cause me
any grief?). Once more, I brought it to John at Rudy’s,
and he helped me to design an intake (“carb manifold”)
for it. I ordered the carb directly from Fageol, and it
comes with a small flange that bolts to the front of the
carb. The carb manifold bolts to the blower, and the
carb & flange bolt to it.
|
|
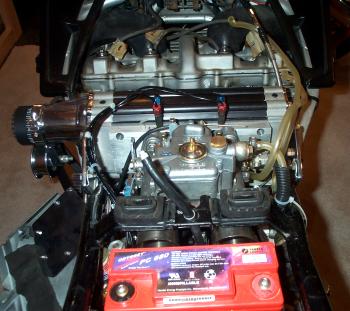
Since the carb actually sits up pretty
high over the engine block, I was able to relocate the
nitrous solenoids and fuel pumps underneath it.
I had the blower intake machined to
accept two fogger nozzles (there simply was not room for
all 4).
Lightning Mike, of Lightning
Performance in North Bay, donated the necessary
components to convert my 4-nozzle nitrous system to a
2-nozzle setup. Once all of the plumbing and nitrous
was relocated, I had to make a small bracket to attach
the nitrous microswitch to the carb (that one that
allows power to the system once full throttle is
engaged), and then I had to install the velocity stacks.
 NITROUS SWITCH ON CARB
|
 NITROUS SYSTEM
I don’t know how
well they work under the hood, or if I even needed them,
but hot damn they look cool, so I was going to install
them. I couldn’t get the carb to fit with them already
attached (not enough space between the carb manifold and
the cross-member that the seat & gas tank attach to, so
I bolted the velocity stacks on once the carb was
attached. |
|
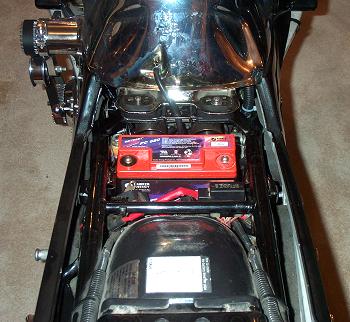
The battery box was now in the way,
and I needed to solve that problem also. The easiest
way to do it, was to remove the entire box completely.
I bolted a small aluminum plate across the hole hat was
left, and had something to rest the battery on. On a
normal bike, this wouldn’t have worked, because the
battery would be up against the shock absorber.
However, on Black Sunshine, there is only an immobile
rod where the shock used to be, so this worked. The
bike gave me a hard time when I first tried to get it
started, and I burned up a couple of regular batteries
trying to get it going. An Odyssey battery (purchased
from Easyriders – it’s the most powerful battery you can
get for a bike, and as intended for 132 cu.in. V-Twin
motors), putting out 680 cranking amps worked. She
starts like a dream, now.
|
 |
|
So the day came. I put the key in, and
checked all of the electrical. Sure enough, everything
worked. Now it was time. With the new battery, the
bike fired up and roared to life. Hot damn; it ran. I
sat quietly, on one of my workbenches, watching the
pulleys turn. It had taken me pretty much a full year
for the supercharger portion. I wish my Dad had been
alive long enough to see the completion of the project
that he had helped me with so much. That startup was
for you, Big Daddy Cool.
The next thing I did was get on the phone
and call as many of my buddies as I could so they could
hear it run.
Running is one thing; running well is
another. In a perfect world, you slap parts onto an
engine and it runs fine. This is not a perfect world.
I first experienced runaway with the motor (caused by
excess air infiltration), and found that I didn’t have a
perfect enough seal on the threads of blower intake
where the NOS nozzles threaded in. I fixed that, and
found the bike still would not idle below 3,000 RPM’s.
It turned out that the bike was a very thirsty girl. In
the end, adjusting my mixture screws solved the
problem. Believe it or not, they are out 8 full turns.
Now, the bike idles at around 1,600 RPM’s, but it does
idle. |
|
The test drive was the
next step. I took the bike out once it was warmed up,
and took a great deal of time getting used to the
quick-turn throttle. The first launch catapulted the
bike and I into a snowbank at the end of my street.
Fortunately, it was at a curve where the City had piled
up snow (we still have it in the month of March), so
bike & I were undamaged. My Mother was laughing her
head off at me from the front porch. She said all I
yelled was “HOLY S**T!” when I cracked the throttle and
kerplooie – into the snow.
I fiddled around with
it over the following summer. I had to relocate the
choke knob, from where it normally sits on the dash of
the FJ to the side panel, just behind the blower plate.
There is a skull theme carried out along the lines of
the bike (covering the mirror bolts, valve stems, etc.),
so I used another there. The line goes directly across
to the choke lever on the carb. I need the choke
engaged every time I start the bike. |
 |
|
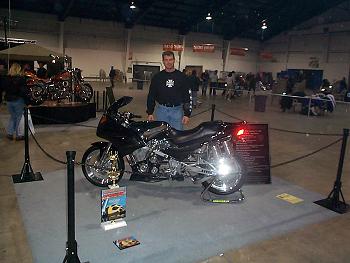 |
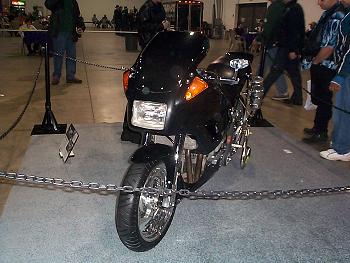
As for riding the
bike, I found that it accelerates like being launched
off of the deck of an aircraft carrier. This may be
tamed somewhat by changing my gearing, say down to a
16/41-tooth combination. The Gixxer front end makes the
bike feel like the rake is much tighter, and it feels a
bit twitchy. The
acceleration is awesome, and best of all, the sound of
the blower under load is pretty cool. It is actually
quite quiet under idle, but when you crack the throttle,
Black Sunshine roars. |
|
|
The only problem is with heat buildup.
Superchargers are naturally bad for engines in that
respect, because they blow hot air into an engine to
begin with. To make it worse, the FJ is air cooled.
Hell; when my FJ was stock it would stall in rush-hour
traffic if the temperature hovered near 30 degrees
Celsius. The supercharger itself gets extremely hot to
the touch after about 15 to 20 minutes of riding, so I
assume this bike is not going to be doing much touring –
it is pretty much a coffee shop bike.
All in all, mission accomplished. I
built it; it runs. If anyone has any questions, or
comments, please feel free to contact me. As well, it
should also be noted that this bike is for sale. I
would be willing to discuss that as well.
Jon Jarosz
-
j.jarosz@sympatico.ca
If you want see a video to assure
yourself that this bike runs -
click here (10MB) (or
right-click to save to your disk)
|
MODIFICATIONS:
·
Fageol MAX-30 twin-screw centrifugal supercharger
·
Supertrapp Stealth stainless exhaust; 14-disc internal
system
·
Weber 45mm dualthroat sidedraft carburator with
stainless velocity stacks
·
Dyna ignition coils & Taylor leads
·
Tsubaki Sigma o-ring chain, 130-link
·
Performance Machine rims & calipers
·
Metzeler MEZ1’s, front & rear (120 front, 170 rear)
·
EBC
pads (green) all around
·
NOS
nitrous oxide kit
·
Suzuki GSXR-1100 upside-down inverted front end
·
Russell braided brake lines
·
APE
clutch spring conversion kit
·
APE
heavy duty billet clutch hub
·
Welded clutch basket
·
High performance headwork – degreed cams, slotted
sprockets, 5-angle valve job,
port & polish by Scott Miller at Fast Company
·
Earl’s oil cooler
·
Braided clutch & oil cooler lines
·
Stainless steel engine, fairing & windshield bolts
·
Custom chromoly NOS bottle brackets
·
Wiseco 1219cc big-bore kit
·
Sprocket Specialties case-hardened 49-tooth rear
sprocket
·
Sunstar 16-tooth front sprocket
·
JMC
swingarm – imported from the UK; top & bottom braced,
extended 4”, eccentric adjusters, mirror polished
·
Custom chromoly shock linkage
·
VFR
750 solid rear drag shock
·
Pingel fuel system
·
Custom one-off supercharger and carb intake manifolds by
John Needham at Rudy’s Machine Shop in Ayr,
Ontario
·
Custom paint: “Anthracite Pearl” by Coop’s
Custom Scoots
·
Tuning, nitrous & custom fabricating by Craig Mark
at Racer’s Choice in Brantford, Ontario
·
Chroming by Gerry Harris at Platingmaster,
in London, Ontario
·
Assembly by owner
·
300 rear-wheel horsepower, on the gas
|
| End of part 2 |
Jon Jarosz
-
j.jarosz@sympatico.ca |
|
Click here
to go back to Part 1
: |
|
|
 |
|
|